Thursday, May 21, 2015

How to change host name in CentOS / REHL

In CentOS /RHEL 7, we have 3 host names:

1. Static host name a.k.a. kernel host name, is initialized from /etc/hostname file at boot time so to change it you can simply enter the new name in this file. 

2. Transient host name, is a temporary host name assigned by a DHCP server or such a program. 

Note: static and transient host names follow the same rules as Internet domain FQDNs so for example you can not use space character in these host names. 

3. Pretty host name, is a free-style form name that you can put on the computer such as "Behnam's Server"

hostnamectl is a new command in CentOS 7 which allows you to view or change the host name. To change all 3 kind of host names at the same time, enter:
# hostnamectl set-hostname www.pournader.com
Another way to change the host name is using nmcli or nmtui:
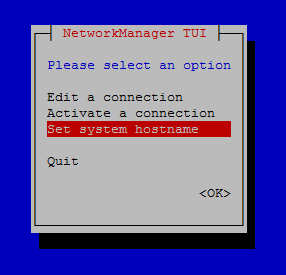
#nmtui
And you will face such an interactive and easy-to-use text user interface:


Note: You do not have to reboot the machine to activate permanent host name change. Just log out and log in again to see the new host name in the prompt. 

If you want to change just one type of the host name simply specify the type of host name as below:
# hostnamectl --static set-hostname www.pournader.com
To clear a particular host name and let it revert to its default:
# hostnamectl --transient set-hostname ""


If you run version 6 or 5 of CentOS / RHEL, steps are totally different. You should do the following:

a. Use hostname command to change the host name:
# hostname www.pournader.com
b. Open /etc/sysconfig/network and edit HOSTNAME value to what you want to put on the host. 

c. Open /etc/hosts and add the appropriate line. Actually this step is not necessary. Also you can do in CentOS / RHEL 7 if you want. 

d. restart network service:
# service network restart
Note: Do not assume by doing the above-mentioned steps your machine becomes available in Windows network. If you want your machine advertise its name on the Windows network, you have to install and configure Samba package and set netbios name directive in Samba configuration file. Consult this post to configure Samba on CentOS / RHEL 7. 

The easier solution might be adding your host name and its IP to the DNS server.

Labels: , , ,

Monday, May 18, 2015

How to Use Wildcards in Linux Commands


Wildcard is a character that can be used as a substitute for any character in a search to increase the flexibility and efficiency of searches. Consult the following list for the usage:


* matches zero or more characters
? matches exactly one character
[abcde] matches exactly one character listed in square brackets
[a-e]  matches exactly one character in the range
[!abcde] matches any character that is not listed
[!a-e] matches any character that is not in the given range
{centos,rhel} matches exactly one entire word in the options given

To list all files in current directory which have an .html or a .jpeg extension:
$ ls *.html *.jpeg
To delete all files and folders in current directory which have the string behnam in their name:
$ rm -rf *behnam*
The following command provides data on all files and folders whose names are one, two or three characters in length:
$ file ? ?? ???
Or the following returns the list of all objects in the current directory that have a three-character or four-character extension:
$ ls *.??? *.????
To show all files that have an extension which starts with a, b or c:
$ ls *.[abc]*
And this one returns information about all files and folders whose names begin with any letter from "a" through "e" or begin with "m" or "n" or "o":
$ file [a-emno]* 
To copy all html and pdf files to home directory you can use curly brackets and enter: 
$ cp {*.html,*.pdf} ~
Note: Do not put space after the commas.  

Labels: ,

Sunday, May 17, 2015

How to Configure Access to iSCSI Target from VmWare ESXi


To access to an iSCSI target from VmWare ESXi server you need an iSCSI storage first. if you do not have have one, do not worry. You can use Openfiler or any other OS like FreeNAS to do so. 
You can find an instruction here to configure iSCSI target using Openfiler. 

Open vSphere Web Client, Choose datacenter and find your ESXi host. 

0. You may need to configure network interface first if you want to use the isolated network for iSCSI not the management interface. Go Manage > Networking and click on Add host networking button:


Then a wizard will show up. Choose VMkernel Network Adapter and click on Next and then select New standard switch and add as much NIC as you want then select Next and another Next and now set the IP address:


Click on Next then Finish. Now you may see such a picture if choose the new virtual switch:


In order to check connectivity, log on to OpenFiler console (or iSCSI target) and ping the IP that you just set (in this case: 172.16.51.35)


1. Go to Manage > Storage > Storage Adapters and click on the plus sign and choose software iSCSI adapter and click on OK


An HBA adapter will show up under iSCSI Software Adapter section:


2. Select the HBA adapter, go to Targets, select Dynamic Discovery and press Add


Enter IP or FQDN of the iSCSI server and click on OK and the rescan the storage adapter:


If you choose the HBA and go to Devices tab you can see iSCSI target that we just added:


3. Now is the time to format the empty target disk with VMFS file system. Go to Related Objetcs > Datastores and rename the existing datastore to something like "local-datastore" just for better understanding. Then press the Create a new store button to open New Datastore wizard.  

Choose VMFS and press Next then choose a target from the list and name it:


Then choose the size on the next step and finish the wizard. You would have 2 datastores right now: one remote and one local as you can see in the following screenshot:


The iSCSI datastore is now ready to use. 
4. If you use an isolated ethernet network to connect your host and iSCSI target, you do not need authentication but if you share the physical network with others, you'd better configure CHAP authentication. If you use Openfiler go to Volumes > iSCSI Targets > CHAP Authentication and Create a username and password. 


Now you should enter the credentials in ESXI adapter. Go to Manage > Storage > Storage Adapters and choose the HBA adapter then select Properties tab and select Edit next to Authentication section. 


Choose the following method and enter the CHAP user and password then click on OK


Labels: , , ,

Saturday, May 16, 2015

How to Use Openfiler Linux as an iSCSI Target


Openfiler is an easy-to-configure Linux distribution as an iSCSI target but as its community is not active, it is not recommended to be used other than in lab environment. For production environments try other solutions like freeNAS.

1. installation is as easy as older versions of CentOS /RHEL as it uses Anaconda as its installer. After installation you may see such a page:


Which tells you you can access the web admin UI via system's IP address and port 446. 

2. Open a browser and enter https://<host ip>:446
The default username is openfiler and password is password.

3. After login, immediately go to Accounts > Admin Password and change the default password. 

4. Go to Services and enable and run the iSCSI service. 


5. We are reserve and use the 2nd NIC with IP range of 172.16.X.X in an isolated network just for the purpose of storage so go to System > Network Setup and do the proper changes(if you haven't done in Anaconda)


6. Go to Volumes > Block Devices and create a partition on the 2nd hard drive by clicking on /dev/sdb
We assume that you have two physical hard drives, 1st drive is reserved for OS and the 2nd drive is for setting up iSCSI target. 
Click on create in order to create a partition on the drive:


7. The PV is now ready. You should create a VG and then create as many LV as you like inside the VG. 
Click on Volumes > Volume Groups, name your VG and check the /dev/sdb volume and click on Add volume group as the following screenshot:
8. We create LV by choosing Volumes > Add Volume fill the fields and click on Create


And do the same to create 2nd LV:


9. Add an iSCSI target by going to Volumes > iSCSI Targets. Then name your target IQN or accept the default name and click on Add. Then go to LUN Mapping on top and click on Map buttons for all LVs in order to map them as LUN 0 and LUN 1. You may face such a picture: 


10. Go to Network ACL on top to set Access Control List. You may see such a message: "A list of networks have not been created yet.You cannot configure network access control unless you create a list of networks in the Local Networks section. Until that time, this iSCSI target will be unavailable."
If you haven't configured ACL in Local Networks section, go ahead and configure:


Go back to Volumes > iSCSI Targets > Network ACL and change the value to allow then click on Update.

Your IP Storage is now ready to use.

Labels: , ,

Wednesday, May 13, 2015

Environment Variable


To see a shell’s variables, issue set command or run:
$ printenv
The scope of the variable is the shell in which it’s defined so to make a variable and its value available to other programs, you can enter:
$ export BPVAR   
Or the shortcut for defining and exporting simultaneously is:
$ export BPVAR=3
This variable is now called an environment variable because it is available to other programs in the shell’s environment. 

Example: To add directories to your shell’s search path temporarily, modify its PATH variable. For example, to append /usr/sbin run: 
$ PATH=$PATH:/usr/sbin
To make your change permanent, you should edit bash startup file which is a hidden file in the home directory: 
$ vi ~/.bash_profile 
Then log out and log back in to load the contents. 

Labels: ,

Monday, May 11, 2015

Notes about Administrator Users in CentOS/RHEL 7


1. To prevent users from logging in directly as root, including yourself!, you can set the root's shell in /etc/passwd file to /sbin/nologin

2. To limit access of users to run su command is adding administrators to an admin group entitled "wheel":
# usermod -G wheel behnam
Then we need to only allow these admin users to run su. So edit the PAM config file for su which is located at /etc/pam.d/su. You should open /etc/pam.d/su file and uncomment the following line by removing the hash mark:

  auth           required        pam_wheel.so use_uid

3. Only the users listed in /etc/sudoers file can to use the sudo command. 

Note: Each successful authentication by sudo will be logged to /var/log/messages and the command issued by the user will be logged logged to /var/log/secure logfile. 

The main advantage of the sudo is that different users can access to only specific commands based on their permissions. You can edit /etc/sudoers by using visudo command to do this. 

For example to give a user full privileges, enter visudo and add the following line in the user privilege section:

  behnam ALL=(ALL) ALL

It means now behnam can use sudo command from any host and can execute any command. 

Or by adding the following line to sudoers file in /etc

  %users localhost=/sbin/systemctl shutdown -r now

Any user can run /sbin/systemctl shutdown -r now as long as it is entered through the console.

In CentOS, sudo stores the sudoer's password for just 5 minutes. If you use it during this period. it will not prompt for a password. This setting can be changed by adding the following line to the sudoers file in /etc:

  Defaults    timestamp_timeout=value

Setting the value to 0 causes sudo to require a password every time. 

Very important: If a user account with sudoer's privilege is compromised, the attacker/cracker can use sudo to open a new shell with full rights by typing the following command: 
# sudo /bin/bash


Opening such a shell as root in such cases gives the attacker/cracker administrative access for ever! 

Labels: , , , ,

Sharing a folder for different users to work on files on a CentOS/RHEL Linux machine


Task: We have a group of people who need to work on files in a shared directory. We need to set permissions for the shared folder and avoiding file permissions conflict. 
# mkdir /opt/bp-project
# groupadd bp-project
# chgrp bp-project /opt/bp-project
# chmod 2775 /opt/bp-project
Now all members of the bp-project group can create and edit files in /opt/bp-project/. Now the root or other admin users should not go ahead and change file permissions every time the users create new files. 


As you see, the group permission in changed from rwx to rws by using 2775 permission on our file. "s" is a special permission flag indicates the setgid. It also can represent setuid if it shows in the file permission section.  

setuid is usable just for executable files, when we set such a permission on an executable file it runs as the user who owns the file (instead of the user who invoked the executable file).

Note: You can put setuid flag on not executable files but it will be showed as S. The capital S informs you that this setting is probably wrong because the setuid bit is useless if the file is not executable.


Octal digit 4 represents setuid and 2 is for setgid so in the above screenshot, abc.txt file has 4744 and the bp-project directory has 2775. 

Note: If you set setuid for a directory it will be ignored by Linux. 

For more information about setuid consult Wikipedia entry

Labels: , , ,

Users and Groups in CentOS / RHEL


system-config-users is a GUI for managing users and groups in CentOs/RHEL systems. Easily use system-config-users at terminal. It is not installed by default on minimal installation so you have to install it 1st: 
#yum install system-config-users 
If your system is not running in graphical target/runlevel, you can use ssh -Y to connect to the server and run system-config-users.  
But you'd better learn how to use commands for the task. To add a user:

# useradd behnam
When you create a user, an entry will be created in /etc/passwd for the user, a user private group (UPG) is created which can be seen in /etc/group file, the home directory i.e. /home/behnam will be created and the contents of /etc/skell will be copped into the user's home directory. 

If this user creates a new file or directory, it gets it's own permission which is different from the default permission for root user's default permission. The setting which tells what permissions are applied to a new file or directory is called umask and is configured in the /etc/bashrc file

Do not forget to set password for the user. If you do not set a password, he/she can not log in:
#passwd behnam

Note: /etc/login.defs is a file to enforce policies of shadow passwords. 

The passwords will be stored into /etc/shadow. It also stores information about password aging. 

To manage Linux password expiration and aging, you can either manipulate /etc/shadow file or use chage command.

To show the aging information: 
# chage --list bp

Of course it is much more human readable than the aging information in the /etc/shadow file which looks like: 


To set password expiration date:
# chage -M 10 bp
Or to disable the password expiration for a particular user, type the following command:
# chage -m 0 -M 99999 -I -1 -E -1 bp
  • -m 0 sets the minimum time between password change to zero days. 
  • -M 99999 sets the maximum time between password change to 99999 days. 
  • -I -1  sets the "Password inactive" to never.
  • -E -1  sets "Account expires" to never.


Sunday, May 10, 2015

Samba Server in CentOS / RHEL 7

Samba is comprised of three daemons: smbd, nmbd, and winbindd. 

  • smbd daemon provides file sharing and printing services to clients as well as user authentication, resource locking, and data sharing through the SMB protocol. The default ports of smbd are 139 tcp and 445 tcp. The smbd daemon is controlled by the smb service.
  •  The nmbd daemon deals with NetBIOS protocol. It means it participates in the browsing protocols that make up the Windows Network Neighborhood. The default port for NMB is 137 udp. The nmbd daemon is controlled by the nmb service.
  • The winbind service resolves user and group information received from a Windows server. This makes Windows users and groups information understandable by our Linux system. The winbindd daemon is controlled by the winbind service and does not require the smb service to be started in order to operate. 
To install samba: 
# yum install samba*
Then create a directory to share: 
# mkdir /samba_share
# chmod 777 /samba_share
Change the SELinux file context so that it can be shared:
# chcon -t samba_share_t /samba_share/
or easily disable SE Linux by editing /etc/sysconfig/selinux or /etc/selinux/config if security is not important for you. 

You may need to create a user: 
# useradd behnam
# paaswd behnam
# smbpasswd -a behnam
Put the following lines in /etc/samba/smb.conf to create a share directory:

  [samba_share]
  comment = Samba share
  path = /samba_share
  valid users = behnam behdad
  public = no
  browseable = yes
  valid users = bp
  writable = yes
  create mask = 0765

And enable and then start the service:
# systemctl enable smb.service
# systemctl start smb.service
Do not forget to open the appropriate ports on firewall: 
#firewall-cmd –-permanent –-add-service=samba
#systemctl restart firewalld

To specify the Windows workgroup and a brief description of the Samba server:

workgroup = BEHNAMWORKGROUP
server string = Behnam's Samba Server

Important: To set up a Windows domain member server, you must first join the domain using the net join command before starting the smb service. Also you'd better run winbind service before smbd.

Mote: When the /etc/samba/smb.conf file is changed, Samba automatically reloads it after a few minutes. Issuing a manual restart or reload is also effective.


Sample config file:

Another simple sample file might be as follow: 

[global]
    workgroup = WORKGROUP
    server string = my Samba server
    netbios name = bp-samba
    name resolve order = bcast host
    dns proxy = no

    log file = /var/log/samba/%m.log


    create mask = 0664

    directory mask = 0775

    force create mode = 0664

    force directory mode = 0775

    security = user

    map to guest = Bad User

    max log size = 50


[Share]

   path = /home/samba_share
   public = yes
   only guest = yes
   writable = yes

Related Tools:

If you want to access the share folder via a Linux client: 
$ smbclient //<hostname>/<share-name> -U <username>
Note: If the -U switch is not used, the username of the current user is passed to the Samba server.
To exit smbclient, type exit at the smb:\> prompt.

Mounting Windows or Samba share in Linux: 
# mount -t cifs //<servername>/<share-name> /mnt/point/ -o username=<username>,password=<password>
Note 1: make sure the cifs-utils rpm is installed on your system.

Note 2: For permanent mount, create a proper entry in /etc/fstab

The following example displays a list of the available shares for a host named behnam-pc:
$ net -l share -S behnam-pc
The following example displays a list of Samba users for a host named behnam-pc:
$ net -l user -S behnam-pc
The nmblookup tool resolves NetBIOS names into IP addresses. nmblookup broadcasts its query on the local subnet until the target machine replies.
$ nmblookup anar
pdbedit is a tool to manage accounts located in the SAM database:
$ pdbedit -a behnam
The smbcacls program modifies Windows ACLs on files and directories shared by a Samba server or a Windows server:
# smbcacls <//server/share> <filename> <options> 
The smbstatus program displays the status of current connections to a Samba server.

The testparm program checks the syntax of the /etc/samba/smb.conf file. it also displays a summary of your smb.conf config file after testing. 

The wbinfo program displays information from the winbindd daemon. The winbindd daemon must be running for wbinfo to work.

Basic System Monitoring Tools in CentOS / RHEL

To list all processes:
$ ps ax
To show the owner alongside each process:
$ ps aux
To show all processes dynamically:
$ top
or
$ gnome-system-monitor
Display the amount of free and used memory on the system
# free
lsblk allows you to display a list of all block devices:
$ lsblk

As you see lsblk displays the device name (NAME), major and minor device number (MAJ:MIN), if the device is removable (RM), the size of the device (SIZE), if the device is read only (RO), the type of device (TYPE) and the mount point (MOUNTPOINT)

And to see block device id and filesystem:

# blkid


findmnt helps you to display a list of currently mounted file systems:
$ findmnt

As you see findmnt displays the target mount point (TARGET), source device (SOURCE), file system type (FSTYPE), and mount options (OPTIONS).

You can filter the output to show just xfs filesystems: 

$ findmnt -t xfs
To display a detailed report on the system's disk space usage:
$ df -h
To show disk usage for each of the subdirectories in the present working directory:
$ du -h
To display information about PCI devices on your system: 
# lspci
And to get more information: 
# lspci -v
To display information about USB devices:
# lsusb
Again you can get more info by using -v switch. 

To list information about CPU(s):
$ lscpu

Saturday, May 9, 2015

Yum Package Installer in CentOS / RHEL


To install a package like samba simply enter:
# yum install samba
To update a package:
# yum update samba
And to update all installed packages:
# yum update samba
To remove a package: 
# yum remove samba
To print the list of current and active repositories, use:
# yum repolist
To print the list of all enabled and disabled repositories:
# yum repolist all
If you need more information about the repositories, enter: 
# yum repoinfo
To query about a particular package like samba:
# yum info samba
Note: rpm -q --info samba works just for the packages which already installed. 

To get more information like the rpm checksum, the command given on the command line that was invoked to install the rpm package (if any), and the reason that the package was installed on the system (where user indicates it was installed by the user, and dep means it was brought in as a dependency):
# yumdb info samba
If you do not know the package name, you still can install it by using one of its files: 
# yum install /usr/sbin/named
If you know you want to install the package that contains a particular binary file but you do not know in which bin or sbin directory is the file installed, use:
# yum provides "*bin/named"
If you have a package to install and the package will demand for dependencies and those dependencies are present in yum repository then the localinstall will become very helpful:
# yum localinstall <path>
To display twenty most recent yum transactions:
# yum history
To synchronize the rpmdb or yumdb database contents for any installed package with the currently used rpmdb or yumdb database, type:
# yum history sync
If you want to take a look at yum storage directory, go to /var/cache/yum/$basearch/$releasever/ which is my case is /var/cache/yum/x86_64/7/ then you can see a directory for each repository. 


Date and Time in CentOS / RHEL 7


timedatectl

To display the current date and time, you can use timedatectl or as other Linux and Unix systems use the standard date command: 
$ date
$ timedatectl
To change the current date, simply enter the following command as root: 
# timedatectl set-time 2013-06-02
To synchronize the system time with an NTP server:
# timedatectl set-ntp true

date command 

As I mentioned before, date command also works in CentOS / RHEL:
$ date +"%m-%d-%Y %H:%M"
To change the current time:
# date +%T --set 13:19:00

hwclock

hwclock is another tool which shows and sets the motherboard time and date:
# hwclock

How to Reset Root Password in CentOS 7

Resetting the root password is not as easy as what you did for CentOS /RHEL 6 or older versions. 
It is no longer possible to change the password in single-user mode because the root password is now required to operate in single-user target. 
Emergency mode also has the same issue.

To reset the password on a CentOS / RHEL 7 box follow these steps:
  • Restart the machine. 
  • On the boot screen, press E key. As you may guess E stand for Edit!
  • Use down arrow key until you reach the line starts with linux16 (if the machine has UEFI instead of legacy BIOS, you see linuxefi instead of linuxe16)
  • Delete rhgb and quiet parameters from the end of the line. (You can use Ctrl+a and Ctrl+e to jump over to the start and end of a line.)
  • Add the following parameter at the end of the linux16 line (or linuxefi): 
      init=/bin/sh
  • Now use Ctrl+x to boot the system. Then shell prompt will appear.
  • Load the initial SELinux policy into the kernel in order to preserve the SELinux context of the files that are to be modified:
# /usr/sbin/load_policy -i
  • As the Linux file system is mounted read-only, you have to remount the file system to make it writable:
# mount -o remount, rw 
  • Now it is ready to change the root password:  
# passwd root
  • Do not forget to mount the Linux file system as read only again:
# mount -o remount, ro
  • Run the following command to finish the system boot:
# exec /sbin/init
  • Do not forget to remove init=/bin/sh from the kernel parameters line and put rhgb and quite again. 

Running DHCP Server in CentOS / RHEL 7


To install DHCP server: 
# yum install dhcp
DHCP config file is located at /etc/dhcp/ directory so if you want to take a quick look you can run: 
# cat /etc/dhcp/dhcpd.conf
:) Yep. It is almost full of empty by default! As it says the sample config file can be found in /usr/share/doc/dhcp*/dhcpd.conf.example so easily copy it over the above-mentioned location: 
# cp /usr/share/doc/dhcp-4.2.5/dhcpd.conf.example /etc/dhcp/dhcpd.conf
Now, it is a good a time to take a look: 
# less /etc/dhcp/dhcpd.conf
Very simple DHCP config file can be as small as:

  subnet 172.16.51.0 netmask 255.255.255.0 {
  option routers 172.16.51.1;
  option subnet-mask 255.255.255.0;
  option domain-search "pournader.com";
  option domain-name-servers 172.16.51.10;
  option time-offset -18000;
  range 172.166.51.11 172.16.51.100;
  }

Now dhcp daemon is ready to start. Let’s start dhcp service:
# systemctl start dhcpd.service 
To enable dhcpd to start at boot time:
# systemctl enable dhcpd
Note 0: The rpm package name is dhcp but the daemon is dhcpd. 

Note 1: DHCP service will only listen on interfaces for which it finds a subnet declaration in the /etc/dhcp/dhcpd.conf file (if the server has more than one interface)


Note 2: DHCP uses the /var/lib/dhcpd/dhcpd.leases file to store the lease database so if you want to show dhcp clients, open dhcpd.leases file. 

Note 3: Instead of changing a DHCP config file and then restarting the service, using omshell tool is an interactive way to connect to a dhcp server, query, and change the configurations of a DHCP server while the server is running. 

Networking in CentOS / RHEL 7 Linux


Lots of networking tools has been changed in CentOS / RHEL 7. For example you no longer can use system-config-network-tui tool to set up eth interfaces.

ethtool

To get some information on ethernet links you can now use ethtool
# ethtool enp3s0
ethtool is handy when you want to change some parameters like speed, auto negotiation, etc. If you've changed any device parameters using ethtool, it will all disappear after the next reboot, unless you edit related /etc/sysconfig/network-scripts/ file(s). Most network configuration files are at /etc/sysconfig/ with the exception of VPN, mobile broadband and PPPoE, which are stored in /etc/NetworkManager/ subdirectories.

Use -S option to display the bytes transferred, received, errors, etc, as shown below:
# ethtool -S enp3s0
If you want to easily identify the NIC card by sight i.e. blinking one or more LEDs on the specified NIC, enter:
# ethtool -p enp3s0
so you can easily find enp3s0 on the server which has more than one NIC. 

Note: If you are familiar with mii-tool from previous versions, it works as well as before.

dhclient

If you are using Windows you should be familiar with ipconfig /release and ipconfig /renew. To do the same thing in Linux you have dhclient so to release ip address enter:
# dhclient -r enp3s0
And to get a new one form the nearest DHCP server:
# dhclient enp3s0

ifconfig

You can list all your network interfaces by using ifconfig as well as ip addr show:
# ifconfig
ifup and ifdown also work fine in RHEL 7. Use them to enable and disable the interfaces.

nmcli

If a config file has been changed using an editor, NetworkManager service must be told to read the config files again.
To do that, run the following command:
# nmcli connection reload
So it seems that the simplest way is using nmcli and/or nmtui but although changes made using tools such as nmcli do not require a reload, do require the associated interface to be put down and then up again. That can be done by using commands in the following format:
# nmcli dev disconnect <interface-name>
Followed by:
# nmcli con up <interface-name>
And right now in CentOS 7 there are too many ways to list the currently available network connections:
$ nmcli con show$ nmcli connection show — active$ nmcli dev status$ nmcli device status$ ip addr show
To view detailed information about a connection:
$ nmcli -p con show <id-string>
Using nmcli in not too easy. For example you should enter such a command for assigning an ip address and gateway:
$ nmcli con add con-name <my-eth1> ifname <eth1> type ethernet ip4 192.168.100.100/24 gw4 192.168.100.1
Adding two DNS servers for an interface is easier:
# nmcli con mod <my-eth1> ipv4.dns "8.8.8.8 4.2.2.4"
And viewing the available Wi-Fi access points is much easier:
$ nmcli dev wifi list
See the nm-settings man page for more information about nmcli.


nmtui

nmtui is nothing but a successor of system-config-network-tui. Use it as an easy-to-use text UI for changing network configurations. It is my preferred way to change the settings. 


ifcfg-*** files

If you take a look at /etc/sysconfig/network-scripts/ directory you may find a dozen of files for interface configuration in the format of ifcfg-***.

This one can be an example of a config file for an interface with static IP:           
  BOOTPROTO=none 
  ONBOOT=yes 
  PREFIX=24 
  IPADDR=192.168.0.1

Example with dynamic IP:

   IP: TYPE=Ethernet 
  BOOTPROTO=dhcp 
  ONBOOT=yes 
  DHCP_HOSTNAME=behnam-pc

In the above example, interface sends a different host name, i.e behnam-pc, to the DHCP server.

If you want to configure an interface to use particular DNS servers (not the one in /etc/resolv.conf) enter: 

   PEERDNS=no 
  DNS1=4.2.2.4 
  DNS2=172.16.51.100


ss command


Do not assume that netstat still exists on CentOS 7 box. Use ss -a to show both listening and non-listening sockets instead as the package net-tools was deprecated in CentOS 7. 

ip command 


The simple syntax is:

ip addr [ add | del ] address dev ifname

Objects in ip command are: 

link | addr | addrlabel | route | rule | neigh | ntable | tunnel | tuntap maddr | mroute | mrule | monitor | xfrm | netns | l2tp | tcp_metrics

So it means that instead of addr in the above syntax you can put each of these objects.  

Bear in mind that again ip commands given on the command line will not persist after a system restart. 
    
To assign an IP address to an interface you can type on of these commands:

# ip addr add 192.168.0.1/24 dev enp3s0# ip address add 192.168.0.1/24 dev enp3s0
And to add the 2nd IP to the same interface:
# ip addr add 172.16.51.34/24 dev enp3s0
Show IP:
# ip addr show
# ip addr show dev enp3s0
Remove IP:
# ip addr del 192.168.50.5/24 dev enp3s0
Enable/Disable NIC:
# ip link set enp3s0 up
# ip link set enp3s0 down 
Or you can simply run ifconfig enp3s0 down (same as ifdown enp3s0) to disable and run ifconfig enp3s0 up (same as ifup enp3s0) to enable the interface. 

Display device attributes:
# ip link show 
Or use ifconfig for the same purpose. 

To check the kernel route table you can run one of the following commands:
# ip route show
# ip route show dev enp3s0
# ip route list
# route -n
Show he route cache (also the forwarding information base):
# ip route show cache
Adding default gateway:
# ip route add default via 172.16.51.1 dev enp3s0
Manipulating the IP route table (Add static route):
# ip route add 10.10.10.0/24 via 172.16.51.100 dev enp3s0
or
# ip route add 192.168.1.0/16 dev enp3s0
or 
# route add -net 192.168.1.0/16 dev enp3s0
Remove static route:
# ip route del 10.10.10.0/24
Again ip commands given on the command line will not persist after a system restart so too add persistence static routes, edit /etc/sysconfig/network-scripts/route-enp3s0 (need to be created) and put the following line:

10.10.10.0/24 via 172.16.51.1 dev enp3s0

Any question? Run ip route help or consult ip and ip-address man pages. 

Route


Syntax: 

ip route [ add | del | change | append | replace ] destination-address
$ ip route add 192.0.2.1 via 10.0.0.1 [dev <ifname>]
Use the ip route command without options to display the IP routing table:
$ ip route
route command also works for the same purpose. 

As you know, man pages are the best sources so for more information consult ip-route man page.

Static route configuration can be stored per interface in /etc/sysconfig/network-scripts/route-<interface> files. 

Such a config file is required only if the gateway is not set via DHCP server and is not set globally in /etc/sysconfig/network file.

For example, static routes for the enp3s0 interface is stored in /etc/sysconfig/network-scripts/route-enp3s0.  

We have to define a route to a default gateway on the first line:

  default via 192.168.100.1 dev <interface>

Note: This setting takes precedence over a setting in the /etc/sysconfig/network file.

If a route to a remote network is required, a static route can be written as follows:

  100.100.100.0/24 via 172.16.51.34 [dev interface]


Note: The address 172.16.51.34 in the above example is the IP address leading packages to the remote network.

So an example of route-enp3s0 file could be:

  default via 192.168.100.1 dev enp3s0

  100.100.100.0/24 via 172.16.51.34 dev enp3s0
  10.10.10.0/24 via 172.16.1.1 dev enp3s0

You can also use the following format for the route-enp3s0 file to make the route permanent:

  ADRESS0=100.100.100.0
  NETMASK0=255.255.255.0
  GATEWAY0=172.16.51.34
  ADDRESS1=10.10.10.0
  NETMASK1=255.255.255.0
  GATEWAY1=172.16.1.1

As you see subsequent static routes must be numbered sequentially starting at 0. It also must not skip any values. 


More about configuring The Default Gateway


The default gateway is determined by the network scripts which parse the /etc/sysconfig/network file first (by default it is empty in CentOS 7). Then it reads the network interface ifcfg-*** files for interfaces that are up.

The ifcfg-*** files are parsed in numerically ascending order and finally the last GATEWAY directive to be read is used to compose a default route in the kernel routing table.

Note: As I mentioned before, /etc/sysconfig/network file specifies gateway and host information for all network interfaces. 


Understanding the Network Interface Device Names

As you may face, the name of an ethernet interface is changed from eth0 and eth1 to something like enp3s0 so if you want to know the source of these name take a look at this list: 

  1. en for Ethernet
  2. wl for wireless LAN (WLAN)
  3. ww for wireless wide area network (WWAN)
  • o on-board device index number
  • s hotplug slot index number
  • x MAC address
  • p PCI geographical location, USB port number chain

Arp

Run the following commands and compare the outputs:
# ip neighbor show 192.168.1.0/24
# ip n show 192.168.1.0/24
# ip neighbor show dev enp3s0
# ip neighbor show
# ip monitor all
Note: arp is depreciated in CentOS 7 so instead of arp -a you should use ip n show. Read more about deprecated Linux networking commands and their replacements here

To add a new neighbor/arp entry permanently:
# ip neighbor add 192.168.1.1 lladdr 00:c0:7b:7d:00:c8 dev enp3s0 nud permanent
Removing from ARP
# ip neighbor del 192.168.1.1 dev enp3s0

DNAT by ip command (one address to one address)

Although the best way to do the NAT is using iptables, it is possible to use powerful ip command: 
# ip route add nat 205.254.211.18 via 192.168.1.17# ip rule add nat 205.254.211.18 from 192.168.1.17# ip route flush cache# ip route show table all | grep ^nat# ip rule show

  • The 1st line tells the kernel to perform NAT on any packet bound for 205.254.211.18. 
  • The 2nd line enters a rule for the outbound traffic into the RPDB. This command rewrites the source address of outbound packets so that they appear to originate from the NAT IP.
  • The kernel maintains a routing cache to handle routing decisions. After making any changes to the routing table, you'd better empty the routing cache by using ip route flush cache
  • 4th and 5th lines allow you to inspect the routing table to check whether or not the NAT rules were added correctly.

Network Manager

Network Manager is a dynamic network control and configuration service to keep up an running network interfaces and connections. In CentOS/RHEL 7 Network Manager is the primary way to manage networking but you can still use legacy network service which is available through /etc/init.d/network script file. 

In order to check whether or not a particular network interface is managed by NetworkManager service:

# nmcli dev status
The output should be something like this:


If it shows connected for an interface (like enp3s0 in the above picture) the interface is managed by NetworkManager. In the above example enp4s0 is not connected to an Ethernet switch so it showed up as unavailable and the loop back adapter is unmanaged which means NetworkManager does not manage this particular interface.